C64 datatool - Commodore 64 Spreadsheet
![]() Hier auch in deutscher Sprache
Hier auch in deutscher Sprache
C64 datatool - Commodore 64 Spreadsheet
|
| Program: | 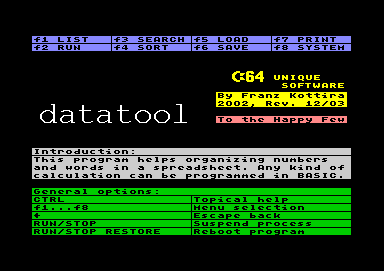 |
|
| Manual: |
Check www.webnet.at/c64/datatool.htm for the latest version, if you use any other source. There is no version number, but a revision date.
Update: December 15, 2003
The C64 is a very nice computer for solving trivial problems concerning calculation by yourself. Simply turn on the machine and write a little BASIC program for your needs. But if you want to provide some comfortable data editing options, the programming effort will grow considerably, and C64 BASIC does not support such a task very well. This was, why I started thinking about a program written in machine language for data management, in combination with free programmable BASIC functions for data processing. I searched for existing solutions, but couldn´t find anything of this kind.
As a hobby programmer, I write programs mainly for my own use. But this one could be useful for other C64 users too. Well, there are not much around, and few of them will have a field of application for such a program. Anyway, it is here, it is free, and if you see a benefit, then download and use it!
C64 Datatool is proper for inputting, editing and printing any kind of data in tabular form. In the simplest way of use, the program will store lists of words or numbers. Data processing (e.g. spreadsheet analysis, statistics or data conversion) can be programmed in BASIC. In the most advanced way of use, Datatool is nothing but a particular environment for your own BASIC programs.
For manuals and other docs concerning C64 BASIC please consult Project 64 Home page or iDOC= .
Finished, tested and frequently used, without observing serious faults. Many thanks to Tom Butz for improving the program text! Bug reports, suggestions and remarks are welcome, please mail to kottira@webnet.at .
Program bug:: If the heading in the title line has more than one line, the display is incorrect when scrolling and the program can crash. In any case, I recommend creating the text in the title line as a single line.
There are 8 files on disk:
All these program files can be loaded with or without secondary address. The loader autoboots if a secondary address is used, but however, all files are executable from BASIC memory by using the command RUN . The main program "datatool.main" is compressed using Pasi Ojala´s pucrunch, therefore it needs 57 instead of initial 77 blocks on disk.
The files are stored in a disk-image "datatool.d64"
and zipped, download ![]() datatool.zip
or datatool.d64.gz (25 kB)
datatool.zip
or datatool.d64.gz (25 kB)
If you want to store this document "datatool.htm" as
well, download ![]() datatool+m.zip
(175 kB) and extract it to a folder
datatool+m.zip
(175 kB) and extract it to a folder
The program is pretty much self-explaining. There is a main menu shown at the top. Select an item, either by using the cursor keys and RETURN, or by using the f-keys. You then will see a table-like user interface. Enter a cell by pushing RETURN. In order to store an entry, push RETURN again. In almost any case the CTRL-key calls a topical help screen, showing present options and keyboard commands. To step back one level, e.g. to cancel an input, use the BACK-ARROW-key at the top left of the keyboard. If you want to stop a running process, try the STOP-key. This will suspend BASIC execution, device access, printing and some time-consuming tasks. If you suspect the program to hang, you can use the combination STOP + RESTORE. This resets the program usually. During operations that require a rebuilding of the worksheet structure, the reset is locked because a disruption of this process would leave an invalid constitution. You may overcome this lock by hitting RESTORE three or more times - on the risk, to lose all your data.
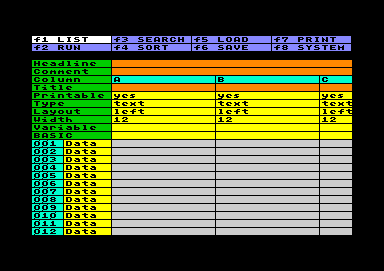 View and Edit the Worksheet
At the top the worksheet there are a few items to adjust:
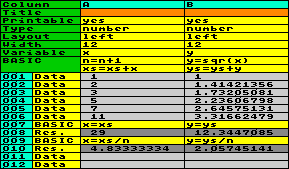
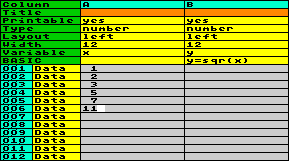 Example:
Let´s suppose, you want to enter a few numeric data in column A,
in order to calculate the square root of these data in column B.
First, set both columns to numeric type and enter the data in
column A. Then assign a variable name to column A, e.g. variable x, and another one to column B, e.g. y. Then you enter the BASIC statement y=sqr(x). When running the program code,
the content of the data in Column A will be delivered to variable x, the BASIC command will be executed, and
the content of variable y will be
stored into column B. This happens row by row. Afterwards the
worksheet looks like this:
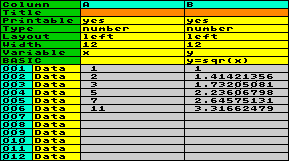
Example:
Let´s suppose, you want to enter a few numeric data in column A,
in order to calculate the square root of these data in column B.
First, set both columns to numeric type and enter the data in
column A. Then assign a variable name to column A, e.g. variable x, and another one to column B, e.g. y. Then you enter the BASIC statement y=sqr(x). When running the program code,
the content of the data in Column A will be delivered to variable x, the BASIC command will be executed, and
the content of variable y will be
stored into column B. This happens row by row. Afterwards the
worksheet looks like this:
At the left of each row there´s a number, ranging from 001 to 999. Due to the memory restriction you will not be able to fill all 26 columns and 999 rows with data, but e.g. a worksheet with 3 numeric columns and 999 rows would be possible with reduced BASIC memory.
Next to the row number there is a cell that allows you to change the row type.
 Example: in
addition to the example above, we want to calculate the sum and
the average of the data in column A and B. Because the variables x and y are
used to read and to store the data, we need different variables
to collect the sum, e.g. xs and ys. And, because BASIC has no direct
access to the number of rows in the worksheet, we need a counter
for that, let´s call it variable n.
The summation has to be done each data-row, therefore we add this
task to the column BASIC, which is executed row by row. In order
to show the sum, we have to transfer it to the assigned column
variables, x and
y in this case, and to provide a result-row. To calculate
and show the average, we furthermore have to divide by the value
of the counter n. Here is the result
after running:
Example: in
addition to the example above, we want to calculate the sum and
the average of the data in column A and B. Because the variables x and y are
used to read and to store the data, we need different variables
to collect the sum, e.g. xs and ys. And, because BASIC has no direct
access to the number of rows in the worksheet, we need a counter
for that, let´s call it variable n.
The summation has to be done each data-row, therefore we add this
task to the column BASIC, which is executed row by row. In order
to show the sum, we have to transfer it to the assigned column
variables, x and
y in this case, and to provide a result-row. To calculate
and show the average, we furthermore have to divide by the value
of the counter n. Here is the result
after running:
Please also take note of the remarks on running the worksheet, describing what actually happens during a run.
Generally, there are two different modes: if you enter the worksheet through the main menu, the cursor moves from one cell to another, and the whole cell flashes. Let´s call it outline-mode. If you enter a cell by pressing RETURN, the cursor moves from one character to another, and only the character in cursor position flashes. Let´s call it input-mode.
Inputting and editing text in input-mode is
very similar to the way, the C64 screen editor works, except that
the repeat funktion is switched on for all keys. Additional there
is a little character buffer. If you DELete a character, which moves the cursor
backwards, the deleted character is saved to a buffer; also a
number of character (up to 250) will be saved, as long as they
are deleted continuously. To insert the deleted characters press C= DEL. This allows an undo of the last
deletion. Continuously means, that you are not allowed to use any
other key then DEL. Example: If you
delete the charakters "abc", move the cursor and delete
"xyz" on another place, then "abc" are lost,
and the buffer contains only "xyz".
If you want to copy some text part into the character buffer
without deleting it, use C= HOME, which
similar as the DEL-key moves the cursor
backwards - you have to start at the end of the part you want to
copy. And in case, you want to delete some text without
destroying the content of the buffer, use CLR
(SHIFT HOME), which acts like the DEL-key
usually does, but without feeding the buffer.
INST (SHIFT DEL) will insert a single space, which has no
effect on the character buffer.
In outline-mode there is a another buffer
available: It contains whole cells, columns or rows. If you want
to delete a single cell, move the cursor to it and press DEL. This will clear the cell, and save the
entry to the cellbuffer. Similar as described
above, C= DEL will insert an entry from
buffer, C= HOME will copy without
deleting, and CLR will delete without
copying. In the same way you can delete, copy and clear a whole
row or a column, if you move the cursor to the cell which
contains the column letter respectively the row number. If you
delete a column or a row, the following columns or rows will
move, in order to close the blank. In the opposite, you can
insert empty columns or rows using INST.
Please note, that DEL in outline-mode
affects the column or row in which the cursor is situated, which
is slightly different from the way it works in input-mode. And
please take into consideration, that buffer operations in
outline-mode imply a few restrictions. First, the buffer can hold
only one item, e.g. a single cell, a row or a column, and he can
only copy into the worksheet, if the destination has the same
format. Example: It´s not possible to copy a numeric data-cell
via buffer to a text data-cell. And if you want to copy a numeric
column into an empty column, you must set the type of the empty
column to number before copying. Secound, copying rows or columns
will overwrite the destination cells only in the case that the
source cells in the buffer are filled. Consequently you can merge
partly filled rows or columns. If this effect is undesired, and
if the destination isn´t empty anyway, a row or column should be
cleared before pasting. Finally, be prepared that operationes
concerning columns or rows may require pretty much time, if the
worksheet is large.
There are a few useful key combinations: C= CRSR right, C= CRSR down, and C= RETURN. The topical help pages of the program, called by pressing CTRL, will tell more about it. The usage differs in outline-mode and in input-mode.
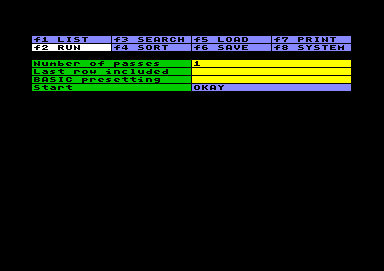 Run the Worksheet
Running a worksheet means, to execute all the BASIC commands you have stored in the worksheet. There are a few items to set first:
If you push RETURN at the Okay cell, the run will start. The system clears the screen and prints the number of the present pass. If you want more interaction during the run, you can prepare your column or row BASIC code and print any kind of information to the screen. Even input from screen respectively keyboard will work, if needed.
For writing proper BASIC instructions in your worksheet, it might be essential to understand how the system works, and how BASIC is executed. Here a brief description:
Finally, one remarkable difference exists, compared to usual BASIC programs: There is no superior stop-command, because the BASIC-sequences in the worksheet are run one after another, and if one is passed - either by end or by stop or by reaching the last BASIC-line of a sequence - the system continues running and calls the next sequence, until it passed the last row of the last pass, or an error occurs. If you want to interrupt the run on a certain condition, you will have to cause an error like: if [condition] then crash , which will stop with an error message. Another possibility is setting the I/O status different from 0, like if [condition] then poke 144,1 , which will stop without error message. Apart from that, the run can be manually stopped with the STOP key.
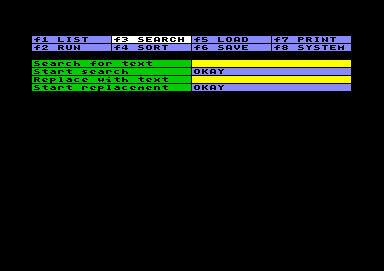 Search for Text
The search will be done in the worksheet, including all datas, text and settings, but not in any other item of the main menu. For example: you will be able to search for a BASIC text sequence stored somewhere in the worksheet, but not for a text sequence stored in the loading section, or somewhere else.
The instruction for searching text is limited to 80
characters; pass over will be ignored without error message.
There is no particular search for numbers and ranges, but you can
search for a number or a part of a number as well. Don´t search
for a certain layout, because the search inquires numbers in the
way they are shown in input-mode, without care about layout
setting.
No wildcard character is available. You only can search for the
(part) text you specify. Lower and higher case letters are
discriminated.
When Search is on the run, you move from one found subject to another using CRSR left/right. If you have choosen the Replace option, movement is the same, but in this case you may press RETURN in order to replace the text found by the text you set as replacement, and to move on forward. If the replacement text is empty, the text found will be deleted.
You always have the option to exit the search and to stay in the present cell by pressing the BACK-ARROW key.
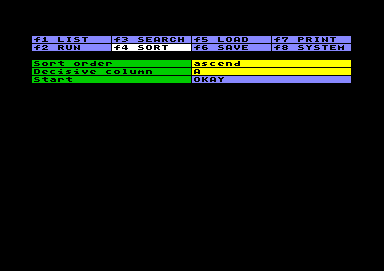 Sort Data
First, you have to choose between sorting from lower to higher value (ascend) or from higher to lover value (descent). Secound, you choose the column, that will be decisive, no matter whether Number or Text type. Then you may start.
The system will sort data-rows. If there are any other rows (e.g. BASIC, Res, Label, Pause) in between, the sorting process will not disturb this arrangement, but the data-rows will be sorted blockwise. Empty rows are sorted last, no matter which sort order is set. But if a row contains something, an empty decisive column will be counted as the very lowest value.
If you want to sort more then one level (representeted by several columns), you have to sort the lowest level first. The sorting routine will keep the rank as fare as the decisive column holds an equivalent value.
Be warned, that sorting a very large worksheet will take a good while. You can interrupt the process using the STOP key, without endangering the data.
 Load Files
An important restriction has to been told first: Datatool is unable to access tape, because memory locations for tape access are occupied by the system itself.
There are two different ways of inputting data from disk. The first one is to Load a native file, in case it was stored as a Datatool file before. You just have to key in the filename. In case the filename consists of spaces at the start or at the end, the length of the filename can be fixed with quotation marks, otherwise overhanging spaces will be cut. (If you don´t remember the filename exactly, press f8, view the directory and copy the filename using the buffers.) Then press RETURN at the Okay cell to load a worksheet, including all settings in all menu items. The system will check if the file is valid, and inform you if it isn´t.
Aside from loading a native file, you can Import data from any source on disk. This option simply consists of three BASIC code sequences. They will be executed in order to open a file, to input row data, and to close the file. Similar to running the worksheet, the opening code is executed once, the import row code is executed in any data-row or result-row from 1 to 999, unless the I/O status changes because the end of the file is reached or an error occurs. Finally the code for closing the file is executed.
| Expample: You want to
import the directory of your game disks, in order to
print the content somehow nice, to sort files by name, to
build up a database, or anything of that kind.
|
 In the sequence for
opening a file, you open a channel for reading the directory "$" from disk, and fetch the
first two bytes of the loading address without using it.
In the sequence for
opening a file, you open a channel for reading the directory "$" from disk, and fetch the
first two bytes of the loading address without using it.
The main task, for importing row data, uses
goto-statements, therefore you have to number the lines.
The lines numbered from 2 to 8 concern the way already existing
data in the worksheet are treated. If you want to collect more
then one directory in the worksheet, you have to consider, that
the code for importing rows is called from row number 1 to the
end of file. BASIC line 2 observes the present load of the
worksheet and counts the highest stored disk-/file number in
variable h. If a row is empty,
variable n will contain zero, and the
process of inputting the directory can start. Otherwise the code
sequence is aborted in line 4. Line 6 sets the new disk number to
the highest number counted until now, plus 1 for the new disk.
The lines of the directory, respectively the file numbers on one
single disk, are counted in variable f,
added in the two decimal places behind the point of variable n. At the first line of the directory,
containing the disk name, f will be
zero. The following directory entrys will be counted up in BASIC
line 8.
BASIC lines 10 to 90 are based on the program example in the 1541
floppy users guide. Line 10 passes two bytes, line 20 fetches two
bytes containing file length. Line 40 builds a numeric value
using the ASC-function and a zero
code in variable c$ to prevent an
error. Line 50 checks if the end of the directory is reached. If
yes, the disk-/file counter is cleared to the pure disk number,
the string "blocks free" is added, and the sequence is
ended. (You don´t have to bother about later, because the
changed I/O status will stop the repetition of the code
automatically.) Line 60 waits for the opening quotation mark,
line 70 collects the filename in variable
na$ until the closing quotation mark appears. Line 80
passes spaces, line 90 collects the file type in variable ty$.
This code sequence will be repeated while reading entry by entry
from the directory, and any entry is passed on to the worksheet
in the form of the variables n, na$, bl and ty$, that are stored to a new row each
time. If the I/O status changes, because the entire directory is
read, the BASIC-cell for closing the file is called. Well, this
one is easy: just close the open file.
 After importing a few directorys,
the worksheet may look like the screenshot on the left.
You are free now to process the data in any way you like.
(Hopefully your game disks are not too much, because at
about roughly 50 disks the memory will be filled.) After importing a few directorys,
the worksheet may look like the screenshot on the left.
You are free now to process the data in any way you like.
(Hopefully your game disks are not too much, because at
about roughly 50 disks the memory will be filled.)This
example was quite elaborating, but it gives an idea of
the versatility of the input-option. You can import data
from a wordprocessor, for example, or you can set up
temporary files for exchanging data between worksheets,
using the export option described next. |
 Save Files
Similar to loading, you have the option to save a worksheet
including all settings as a Datatool program file, or to export
data to any destination, by using your own BASIC code. To Save
a worksheet, just type in the filename (you can use quotation
marks to fix the length of the filename) and press RETURN in the cell of your choice: save,
verify, or both. To overwrite an existing file, enter @: before the actual filename. The system
will then scratch the file on disk before saving (it will not use
the buggy floppy command to overwrite).
Worksheet files are stored as a "prg"-file, and you can
actually run them: If you start a session on the C64, you can
load a worksheet file and run it, as
well as you can load
"datatool",8,1 first, and the file afterwards.
The Export option is the counterpart to the import option described above. The opening code is executed once, the export row code is executed for every filled data-row or result-row in the worksheet (label-, pause or BASIC-rows are ignored), and finally the BASIC sequence for closing the file is called. You may use this option for transferring data to another program, e.g. a word processor, or for exchanging data between worksheets. A few remarks on that matter are given in the Tips&Tricks section.
.![]() top
top
 Print the Worksheet
The program offers no drivers for different sorts of printers, but still it has a few features for controlling the output. Anyway, the output consists of worksheet headline, comment, column title and a range of worksheet rows, except rows containing BASIC. Row number and row setting also will not be printed.
Print from / to row is updated by the system itself, but you can change it, of course.
Same with Print from / to column: The range
of printed columns is proposed by the system, but it can be
changed. Beside that, specific columns can be set not printable
in the worksheet setting.
You will have to watch the length of a line on the printer
output. To the width of every printable column one character has
to be added for the grid line (or space) between rows, plus one
character for the grid line at the very left. If your printer
allows it, the system will be able to output 160 characters each
line.
In the cell Column grid line a single character in ASCII code can be specified, that will be printed between the columns. If no value is set, a space will be printed instead.
In the cell Row grid line a character can be specified, that will be printed between the rows for all row length. If space (ASCII 32) is set, an empty row will be printed. If no value is set, there will be no extra line between the rows.
In the cell Intersection another character can be defined, that will be printed wherever the grid line of column and row intersect.
Perform / Reset headline allows to set a code (or a code sequence) that will be sent to the printer before and after printing the worksheet headline. If more then one ASCII code is needed, the codes have to be separated using SHIFT RETURN . If no value or zero is set, the cell has no function.
Similar Perform / Reset col. titles can be used to control the appearance of the column titles in the same way.
The cell Define print codes can be used to
assign a specific ASCII code to any character. There are a lot of
printers around, requirering different ASCII codes for non
standard characters. E.g. you can specify the actual printer code
for the special characters éäöüßÄÖÜ here. Please note,
that the shifted space is internally processed as ASCII 224, you
maybe have to set the common ASCII 160 here.
The input form requires, that you type in the referred character
first, and (with or without space) the ASCII code in numbers
afterwards. You are free to write a comment after the digits. You
must use a new line for each character and code number
using SHIFT RETURN . The system will
pass by failed syntax without error message.
If ASCII set IBM is selected, the characters a...z will be converted to ASCII code 97...122, and A...Z to 65...90, instead of the CBM standard in lower case, where a...z are represented by code 65...90 and A...Z by 193...218.
The cells BASIC open printer and BASIC close printer must be filled with an executable BASIC code. Printers have different needs and opportunities, concerning the opening procedure. Maybe you have to open several files in order to adjust your printer, and maybe you have to send a few commands first. In case you open more then one file, the output of the actual worksheet data will be sent to the file number that was opened or used last. The output itself can´t be controlled by BASIC, because it is a copy of the screen display. But there are several options anyway: You may use the export data option for sending data to a printer, as well as you may print to a file if you open a disk file instead of a printer.
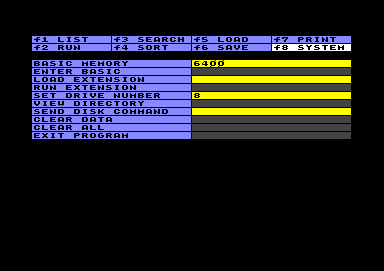 System Options
This part of the main menu offers miscellaneous features. Run some by simply pushing RETURN in the left part of the screen, and others by providing input into the right part of the screen.
Extensions are small add-on programs with supplementary features. You can load and run them in the system options menu. The advantage of this conception is that the main program is not burdened with a lot of functions which maybe never are used. The disadvantage is that extra functions have to be loaded seperately in case they are needed.
Once loaded, an extension is available in the system als long no other extension is loaded instead of it, no matter if you e.g. load another worksheet or if you do a "Clear all".
As you will notice, the extensions hold inherent setting tables, in which you can do certain adjustments. If you store a native Datatool file, the extension settings will be stored as well. This means, if you use a file repeatedly in combination with a certain extension, you don´t have to input the same settings again and again. But this does not change the fact that you have to load the extension itself on system level, in order to access the stored settings.
The extension is loaded as "pivot.extn" in the system-option menu. The purpose is to convert a database into a cross-table aka pivot-table. Introductions and examples to this technique can be found in the net.
To give another example here: Let´s assume, you´ve created a list of all your Commodore-stuff, which looks like the screenshot below:
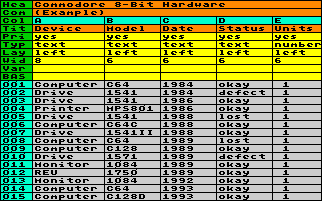 You provided several columns, containing
items in a limited range of possibilities (A type of
device, B model, C purchase date, D status) and a numeric
column (E number of units). You provided several columns, containing
items in a limited range of possibilities (A type of
device, B model, C purchase date, D status) and a numeric
column (E number of units).Now, you would like to know which of your models are okay, defect, lost or whatever. Because the list grew during the years, it became tangled. Maybe you could solve this problem with BASIC, but it would be better to generate a new table, based on the existing data, containing exactly the information you need. |
 Run the extension
and make a few adjustments in the extension setting
first. Afterwards you should save the original worksheet
file, because in this way your settings will be stored as
well, in case you want to generate a new pivot-table
later on, e.g. due to changes in the database. Run the extension
and make a few adjustments in the extension setting
first. Afterwards you should save the original worksheet
file, because in this way your settings will be stored as
well, in case you want to generate a new pivot-table
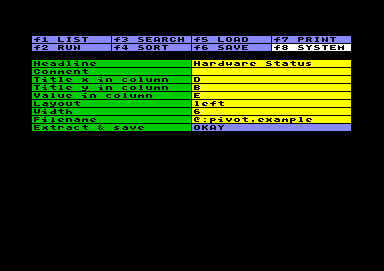
later on, e.g. due to changes in the database.The extension will create a new worksheet file on disk, based on selected data of the original worksheet. (By the way, the original printer settings will be taken over automatically.) Specify Headline and Comment for the new worksheet. Next, you have to select which column data should be processed. Title x relates to the horizontal axis: the content of the specified column will be transferred into columns of the pivot-table. In our example, we choose column D, containing the status. Title y relates to the vertical axis: the content of the specified column will be transferred into rows of the pivot-table. We choose column B, containing the model. The column specified as Value represents the data that will be arranged depending on x and y. In our case this is column E, holding the number of units. The settings of Layout and Width will anticipate the design of the new worksheet. We choose width 6, in order to fit in the result to a screenshot. Of course this can be changed later on. Finally, you have to enter the Filename of the new worksheet. The file will be stored on disk, using this filename. Therefore you won´t see the result immediately after running Extract & save, because you first have to load the new file. In case you create pivot-tables on a certain database repeatedly, you can save time by storing the filename in menu f5 of the original worksheet as well. |
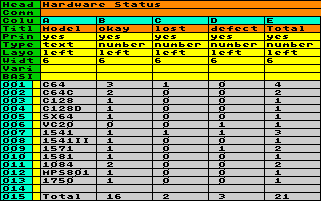 After loading the
new file, you will find a column at the very left, which
contains the data specified as Title y. Identical entries
(e.g. 4 times C64) are subsumed to one single row. The
row sequence depends on the original worksheet, therefore
in this example we sorted the data on column A before
running the extension, for the purpose of getting the
data grouped by the type of device. The following columns
of the pivot-table are titled on base of the entries
defined as Title x. The numeric data represent the
defined value, associated to the axis x and y. At the
very right, a column is generated containing the line
total. Analogous, at the bottom a row is generated
containing the column total. (In case you want to process
the data using BASIC, you have to take care, not to
process the column total as well - you can e.g. set a
flag using a BASIC-Row before.) After loading the
new file, you will find a column at the very left, which
contains the data specified as Title y. Identical entries
(e.g. 4 times C64) are subsumed to one single row. The
row sequence depends on the original worksheet, therefore
in this example we sorted the data on column A before
running the extension, for the purpose of getting the
data grouped by the type of device. The following columns
of the pivot-table are titled on base of the entries
defined as Title x. The numeric data represent the
defined value, associated to the axis x and y. At the
very right, a column is generated containing the line
total. Analogous, at the bottom a row is generated
containing the column total. (In case you want to process
the data using BASIC, you have to take care, not to
process the column total as well - you can e.g. set a
flag using a BASIC-Row before.)In the result, you can see clearly which models in your collection are available in which status. You could arrange a pivot-table showing model and purchase date in a similar way, and in case you provided a column for the purchase price, you easily could find out how much money you spent in certain years for what kind of stuff. Using the bar-extension you can represent the data in a bar chart, which makes things even more clearly. |
This was an illustrative example. Finally some remarks on conditions and limitations of this little extension:
The name of this extension is "plot.extn". It visualizes numeric data in a two-dimensional chart. The worksheet data must be grouped in columns, so that the rows contain the data subsets for each point. Only rows of data type are processed, result- rows and other row types are ignored.
 If you want to overlook any data profile
briefly, the setting is very easy: just enter a column
letter in the input field Column for
each axis, and leave the Scale at automatic.You
may specify up to three columns in the y-axis,
represented by different plot markers (point, cross and
square). The system filles in the rest of the setting
automatically and produces a graph in the size of 20*20
screen characters. If the system doesn´t find at least
two different values in each axis, a "Missing
data" error will pop up. Empty data cells in the
worksheet will not be counted as zero, but as no data at
all. If you want to overlook any data profile
briefly, the setting is very easy: just enter a column
letter in the input field Column for
each axis, and leave the Scale at automatic.You
may specify up to three columns in the y-axis,
represented by different plot markers (point, cross and
square). The system filles in the rest of the setting
automatically and produces a graph in the size of 20*20
screen characters. If the system doesn´t find at least
two different values in each axis, a "Missing
data" error will pop up. Empty data cells in the
worksheet will not be counted as zero, but as no data at
all.In many cases the automatically generated chart will not be really satisfactory. Now you can change the scale to manual (seperate for each axis) and arrange the setting parameters by yourself. They will affect the chart as follows:
The relation of value step and scale step determines the actual scale factor. If you higher scale step, or if you lower value step, the graph will become bigger. Starting from the size of the automatic creation, you can enlarge the graph two times in y-direction and three times in x-direction. If you want to change one of this parameters without changing the graphs size, you parallel must change the other one, in order to keep the relation (raughly) equal. If the data (especially in the x-axis) are present in constant intervals, the resolution should fit to the inverval, in order to achieve a proper visual output. The resolution is defined by the division of value step / scale step. There must be an integer relation between resolution and interval, either an integer multiplication or a fraction by an integer number. Possibly you will have to fiddle around with the settings for a while until it suits. Don´t be timorous while testing, because nothing worse can happen. There is no error message if the graph is too big to be shown as a whole, because intentional there should be the possibility to zoom a small part ot the graph, leaving the rest out of account. |
 The example on the left treats the calculation of different powers of x, whareas x is growing in constant steps of 0.1 in the range of -1 to +1. The BASIC-generated worksheet consists of 21 rows in 4 columns, one column holding the x-value, and three columns holding the x^1, x^3 and x^5 functions. The plot setting simply was done by entering the column letters A (axis x) and B-D (axis y). Because the example was adapted for a plot example, automatic detection shows an acceptable picture. |
The chart output area is 80 characters wide and 50 characters
high - that means double screen size in both directions. You can
move the screen by pressing the CRSR-keys.
HOME brings you back to the start
position, LEFT-ARROW or RETURN leads back to the chart
setting.Resolution in x-Direction is one screen character, and a
half screen character in y-direction. If plots of different
y-columns overlap below the resolution ability, the plot markers
merge to a filled square.
The labeling of the axes is determined by the selected scale step. The system takes over layout and column width from the worksheet, so the labels are placed in the center of the scale division using the column width. If the labeling misses alignment, you can cure that by changing the column layout and width in the worksheet. The disposable width, ich which you can manipulate, depends on the scale step in x-direction and is at the most 12 characters in y-direction.The labeled values itselfs are calculated on base of minimum and value step.
Provided that the worksheet column are titeled, the title is pasted in together with the corresponding plot marker symbol as legend above the chart, concerning the y-axis, and below (not visible in the screenshot), concerning the x-axis. If you entered a chart title in the chart setting, it will appear above the y-Legend (also not visible in the screenshot).
An option for printing charts does not exist and is not even targeted. But there is an extension that exports charts as GeoPaint file, in order to process and to print it using Geos.
The name of the extension is "bar.extn". It
represents data in colored bars. The data in the x-axis
can consist of text or numbers.  This type of chart
is appropriate for smaller amounts of data that should be
made comparable under different aspects. While
scatterplots rather are used for visualization of raw
data, bar charts are effective for representing refined,
already processed data. Different from the plot
extension, rows of result-type are processed as well.
(You can take in column totals or averages, if desired,
but you also can exclude them by setting a certain row
range.) This type of chart
is appropriate for smaller amounts of data that should be
made comparable under different aspects. While
scatterplots rather are used for visualization of raw
data, bar charts are effective for representing refined,
already processed data. Different from the plot
extension, rows of result-type are processed as well.
(You can take in column totals or averages, if desired,
but you also can exclude them by setting a certain row
range.)The extension is easy to handle and a good
supplementation of the pivot-extension,
because any pivot table can be represented in a bar chart
immediately. The screenshot at the right shows the pivot
example given above. Don´t get confused by of the
different system of coordinates: The axis which was
created as the pivot y-axis becomes the x-axis in the
chart. |
Concerning the setting, enter the letters of the columns containing the data in the input field Column. The column assigned to the x-axis can be numeric or alphanumeric. The content is treated as a sequence of items, in consequence there is no minimum and maximum; instead of this you can specify a range of rows by setting From row / to row. The Scale step of the x-axis determines in which intervals the entries are placed, counted in screen characters. The value has to be between 2 and 30. The required interval depends on the number of bars and on the length of the labeling. If the scale step is smaller then the number of bars, it will be ignored.  You can specify up to 8 y-variables by
entering the corresponding column letters in the Column
fields of the y-axis. This data will be represented as
different colored bars. The Scale step
in the y-axis determines the interval between the scale
lines. This value also has to be between 2 and 30. You
can select automatic or manual Scale. If
scale is set to automatic you mustn´t
care about the rest of the settings. The automatic will
create a bar chart 10 screen characters high. Scale step,
in this case, should be set to 5, 10 oder 20 (resulting
in three, two or just one scale line). If scale is set to
manual, you can stipulate the graph
parameters by yourself. It can be recommended to do the
first run using automatic and to adjust the parameters
afterwards. Min. and Max.
determine the range in the y-axis. Different from
scatterplot, it does matter if a value exceeds the range,
because this will cause an error - precise a BASIC-error
(the extension uses the C64 BASIC interpreter for
calculation). The Base-value determines
the baseline from which the bars are drawn. In most of
the cases it will be identical to the minimum value, and
the bars will grow upwards. But you can fix a higher base
value, which causes the bars to grow downwards. The base
value mustn´t coincide with the scale step; you can use
any odd value, in order to show deviations from an
average or from any other expected value. Value
step determines, corresponding to scale step,
the value difference between scale lines in y-direction.
You must be carefull now, because the relation of scale
step (in screen characters) and value step (in units of
y) determines the scale factor and the size of the graph.
Different from scatterplot, you can´t zoom a part, and
an overflow of 30 screen characters hight will cause an
error. Value step must be higher then (Max.-Min.) * Scale
step / 30, to avoid an error. Keep the relation between
scale step and value step in mind when manipulating one
of this parameters. You can specify up to 8 y-variables by
entering the corresponding column letters in the Column
fields of the y-axis. This data will be represented as
different colored bars. The Scale step
in the y-axis determines the interval between the scale
lines. This value also has to be between 2 and 30. You
can select automatic or manual Scale. If
scale is set to automatic you mustn´t
care about the rest of the settings. The automatic will
create a bar chart 10 screen characters high. Scale step,
in this case, should be set to 5, 10 oder 20 (resulting
in three, two or just one scale line). If scale is set to
manual, you can stipulate the graph
parameters by yourself. It can be recommended to do the
first run using automatic and to adjust the parameters
afterwards. Min. and Max.
determine the range in the y-axis. Different from
scatterplot, it does matter if a value exceeds the range,
because this will cause an error - precise a BASIC-error
(the extension uses the C64 BASIC interpreter for
calculation). The Base-value determines
the baseline from which the bars are drawn. In most of
the cases it will be identical to the minimum value, and
the bars will grow upwards. But you can fix a higher base
value, which causes the bars to grow downwards. The base
value mustn´t coincide with the scale step; you can use
any odd value, in order to show deviations from an
average or from any other expected value. Value
step determines, corresponding to scale step,
the value difference between scale lines in y-direction.
You must be carefull now, because the relation of scale
step (in screen characters) and value step (in units of
y) determines the scale factor and the size of the graph.
Different from scatterplot, you can´t zoom a part, and
an overflow of 30 screen characters hight will cause an
error. Value step must be higher then (Max.-Min.) * Scale
step / 30, to avoid an error. Keep the relation between
scale step and value step in mind when manipulating one
of this parameters. |
The example, on which the screenshot at
the right is based on, treats the different ways of
producing random numbers using C64 BASIC. rnd(1) generates a series of
random numbers - always the same numbers starting from
the point the machine was switchend on. rnd(0) generates new, unrepeatable
random numbers when called. 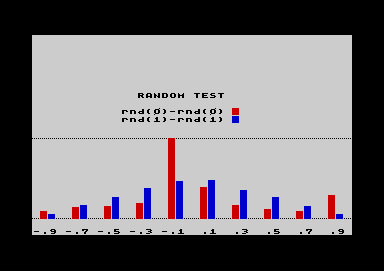 The investigation now is focussed on the
subtraction of two random numbers produced in the one or
in the other way. The methode in detail is irrelevant in
this context, but to outline it briefly: In menu f2,
BASIC presetting, two array variables are installed, one
for each random type. The result of the subtraction of
two random numbers is grouped in 10 value classes, each
hit in each class counts up the corresponding array
variable, in a loop of a few thousend times. The column
BASIC in the worksheet transferres the array variables to
data cells after the presetting run is finished. The
worksheet afterwards consists of 10 rows and 3 Columns.
The column related to the x-axis is filled with the mean
value of the 10 value classes (+/- 0.1), the two
y-axis-columns hold the corresponding hit frequencies. The investigation now is focussed on the
subtraction of two random numbers produced in the one or
in the other way. The methode in detail is irrelevant in
this context, but to outline it briefly: In menu f2,
BASIC presetting, two array variables are installed, one
for each random type. The result of the subtraction of
two random numbers is grouped in 10 value classes, each
hit in each class counts up the corresponding array
variable, in a loop of a few thousend times. The column
BASIC in the worksheet transferres the array variables to
data cells after the presetting run is finished. The
worksheet afterwards consists of 10 rows and 3 Columns.
The column related to the x-axis is filled with the mean
value of the 10 value classes (+/- 0.1), the two
y-axis-columns hold the corresponding hit frequencies.The resulting chart gives a clear impression that rnd(1)-rnd(1) produces a well-proportiond normal distribution. In contrast, rnd(0)-rnd(0) shows peaks, that are anything else but random. (rnd (0) calculates random numbers on base of a timer and can be considered random only in case there is a random periode of time between requests, which is not provided in a running BASIC program.) |
Similar to scatterplot, the chart output area is 80 characters wide and 50 characters high - that means double screen size in both directions. You can move the screen by pressing the CRSR-keys. HOME brings you back to the start position, LEFT-ARROW or RETURN leads back to the chart setting. The maximal size of the graph itself is 30 screen characters higth and 66 characters width. The resolution in y-direction is one pixel, or Value step / Scale step / 8 expressed in y-values.
The x-axis is labeled with the entries of the assigned column. Each label text starts one character left from the first bar. You can effect the labeling by changing layout and width of the column in the worksheet. Width should not exceed the scale step. The order of the colored bars is determinated by the order of columns in the worksheet, not by the order in the chart setting.
Scale lines in y-direction are labeled with values that are calculated on base of minimum and value step. You can set up many intermediate lines (at the most each second screen line) or no one at all by changing scale step. If base-value differs from the scale lines, it will be labeled separately. The layout of y-labeling also is affected by the layout and width setting in the worksheet. Width is limited to 12 characters. Above the graph the legend of the colored bars is inserted, using the column titles of the worksheet. At the very top the chart title is placed, if it was given in the chart setting.
An option for printing charts does not exist and is not even targeted. But there is an extension that exports charts as GeoPaint file, in order to process and to print it using Geos.
The extensions described above generate charts on the screen. Due to the many different types of printers it is not easy to produce a paper output. GeoPaint is a popular application and provides an unbeatable variety of drivers. Converting charts to GeoPaint seems to be the comparative shortest detour.
The name of the extension is "chart2geos.extn".
After you settled a scatterplot or bar chart on screen, load and
run the extension in the system menu. Please note that you must
avoid the usage of the cellbuffer, because the graph is buffered
there. Don´t push RETURN in the
directory, for example, because this copies a filename to the
buffer, and the chart is gone!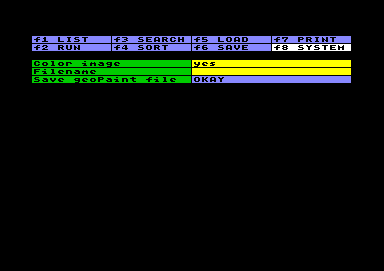
The chart is converted to the Geos-VLIR-format, which has a few implicationes. The DOS of Commodore floppies can´t manage this file format correctly. A v(alidate)-command to the floppy deletes the graphic data, although the filename remains in the directory. In the other way a s(cratch)-command delets the filename in the directory, but not the graphic data. When inputting a Filename you can instruct the system to overwrite an existing file by using the prefix "@:". This deletes and rewrites the directory entry, but the blocks used by the old file are not freed. Therefore, if you repeatedly overwrite a file, the available disk space will become less and less. In this case you should use the Geos operating system for validating the disk without endangering valid Geos-files. Preferably you should store the GeoPaint-file on separate Geos-disks, in order to avoid confusion.
 The setting of Color image
determines whether the chart is exported in color or
black&white. Concerning scatterplots this setting is
meaningless, concerning bar charts the color of the bars
can be replaced by patterns, in case you don´t have a
color printer. The setting of Color image
determines whether the chart is exported in color or
black&white. Concerning scatterplots this setting is
meaningless, concerning bar charts the color of the bars
can be replaced by patterns, in case you don´t have a
color printer. |
If there is no chart in the puffer (maybe because the buffer was used otherwise), the system reports an "Incompatible format" error. If you try to overwrite an existing file without using "@:" a drive error "File exists" will pop up. If the disk is full and overruns during saving, there will be an "Illegal track or sector" drive error, which means that there is no legal track or sector left for storing. Theoretically the extension should work with all types of floppys, but it only was tested with a 1541 and a FD2000 in 1581 mode.
The extension program is a modified version of a saver of the C64 Image Processing System GoDot. Many thanks to Arndt Dettke for providing a commented source code!
 Error Messages
Errors come in several flavours: errors issued by the BASIC interpreter, drive errors and lastly system errors and warning messages.
System warning messages:
System error messages:
If calculations are performed using column variables, the
result will be shown even though it is zero. Maybe an empty cell
instead of a zero would look nicer. For this purpose an unused
column must be set to numeric type and equipped with a column
variable, e.g. the empty column Z with the variable z. This variable, representing an empty
cell, can now be copied to any other variable, e.g..: if a=0 then a=z.
Mathematical there is no difference between an empty cell and
zero, and it does not affect calculation in BASIC. But some
extensions do make a difference, e.g. the chart extensions will
interprete empty cells as not existing data!
In case of recurrent text entries, you can save time by using abbrevations and column BASIC for completing, e.g.:
if a$="x" then a$="Title
X"
if a$="y" then a$="Title Y"
if a$="z" then a$="Title Z"
The conversion of numbers to characters for presentation on screen slows down scrolling, in particular if there are a few numeric columns with small width on the screen. If most of the work in the spreadsheet is done by editing and less by calculation, it can ease working if the data are entered as text and converted only for the purpose of calculation by BASIC using the VAL() function. This will speed up scrolling, but is will slow down BASIC run, and as further disadvantage the chart extensions can´t be used on text data.
In some special cases, e.g. approximation computation, it could be usefull, if the previously unknown number of rows could be set by BASIC itself during the run. This can be achieved by manipulation of system registers. The following registers (decimal memory location) can be used either to read or to store values:
| 167 (Low-Byte) | 168 (High-Byte) | current row number in run (can only be read or increased) |
| 679 (Low-Byte) | 682 (High-Byte) | presetted number of passes |
| 680 (Low-Byte) | 683 (High-Byte) | presetted number of the last row included in the run |
| 681 (Low-Byte) | 684 (High-Byte) | number of the current pass |
The system-specific counting of row numbers is 9 rows higher then the row number shown in the worksheet, because the setting rows are counted as well. E.g. peek(167)+256*peek(168)-9 would output the current row number between 1 and 999.
C64 BASIC and the Commodore DOS provide the capability of storing and reading data directly on disk. The appropriate filetype is the sequential file, labeled with SEQ in the directory. Keep a few rules in mind:
The BASIC statements print#, get#, and input#, are quite comfortable for exchanging data, but a little bit tricky also. Here an overview:
| Strings | Numbers | |
| Send | print#2,x$ sends the content of x$ and a "carriage return" (CR = ASCII 13) afterwards, which tells the end of the variable. (You can supress the CR by adding a semicolon: print#2,x$; ) If the variable is supposed to be received with input# , it should not contain a comma, and it should not be empty. Check for empty string before, e.g.: if x$="" then x$=chr$(0) | print#2,x sends
a number - not in any special numeric format, but it
converts it into a string of digits, ended with a CR. For sending single Bytes (0-255) you can convert the Byte in a single character and send the ASCII-code: print#2,chr$(x); |
| The print# statement can be used with several variables strung together, separated by semicolons or commas. The effect is that all variables will be sent without recognizable separation, loosing their allocation. This only might be useful in the case that variables consists of one single byte by agreement. Otherwise a single print# statement should be used for each variable. | ||
| Receive | get#2,x$ will fetch one single byte or character. The only exception is, that if the byte is zero, x$ won´t contain a zero code, but will have zero length. If you want to do the ASC-function, you must calculate it as x=asc(x$+chr$(0)) in order to avoid a BASIC error. | get#2,x expects a single digit coded in ASCII. Any aberration will be prompted with an error message. Therefore this variation is rare. In order to get a singe byte, use get#2,x$ and the ASC-funktion instead. |
| input#2,x$ will collect characters until a comma (ASCII 44) or a CR (ASCII 13) tells the end of the variable. The received string is not allowed to have zero length, and the maximum length is limited to 80 characters. | input#2,x acts like with string variables, but converts the collected string into a numeric variable. If the received characters don´t fit, it causes an error message. | |
| The get# and input# statements can be used with several variables strung together, separated by commas. This is no counterpart to the similar looking print# statement. The varaibles strung together will be received in the same way, as it would be with several single statements concerning one variable each. | ||
| Franz Kottira | kottira@webnet.at | Frankie´s C64 Seite |
 First, you
prepare the worksheet. You designate a sequence number
for disk and file in column A, assigned to variable n, numeric type, 6 characters
width, 2 fixed decimal places. It will hold the disk
number in the integer part, and the file number in the
decimal places. Furthermore variable
na$, which stores disk- and filename in column B;
variable bl containing the
number of blocks in column C; and finally variable ty$ for showing the file type in
Column D.
First, you
prepare the worksheet. You designate a sequence number
for disk and file in column A, assigned to variable n, numeric type, 6 characters
width, 2 fixed decimal places. It will hold the disk
number in the integer part, and the file number in the
decimal places. Furthermore variable
na$, which stores disk- and filename in column B;
variable bl containing the
number of blocks in column C; and finally variable ty$ for showing the file type in
Column D.